
Are you tired of your phone always occupying your hand? Well, that is just one big annoyance that has a super simple and easy solution. Resin bee phone stand can come to your rescue when you need to see your phone screen, but you also have to use both your hands to do the work you are doing.
Making resin bee phone stand can be an interesting activity that can lead to the creation of a very useful tool. So, scroll down to find the list of supplies you need for the resin bee phone stand project, and the instructions you need to follow to turn this project into a reality.
Supplies Needed
Below is the list of supplies you require to make your resin bee phone stand:
- Epoxy Resin and Hardener
- Honeycomb Silicone Mold
- Bumble Bee Silicone Molds
- Zigzag Round Tray Silicone Mold
- Bubblegum Girl Silicone Mold
- Cylinder Cup Silicone Mold
- Honey Brown, Mustard, Teal, and Baby Pink Mica Powder
- Mustard Alcohol Ink
- Ash White, and Black Acrylic Paints
- Paint Brushes
- Gold, Black, and White Paint Markers
- Rubber Spatula to even out the Resin
- Scissors
- Poke Needle
- Small Cups with Thin Spouts
- Mixing Stick
- Resin Curing UV Flashlight
- All is Well Flower Charm
- Mini LED Desk Lamp
- Gloves
Step by Step Instructions
Below is the list of detailed instructions that you can follow to make beautiful resin bee phone stand:
1. Tint Resin for the First Mold
As you will first be working with your honeycomb mold, you need to tint your resin honey brown to give the project a natural look. For this purpose, you need to take your honey brown mica powder and put it first in the container before pouring resin mixture over it. This is to avoid the mica powder residues staying on top and creating mess. After this, take your mixing stick and mix the colorant and resin mixture well to get a smooth texture.
After tinting the resin honey brown, you need to pour the mixture into your honeycomb mold using a small cup with thin spout to control the quantity. Here, you can use a rubber spatula to spread out the resin evenly in your mold. Make sure that you have covered the sides and corners of the mold as well. Once you are done pouring the resin, you can set it aside to cure overnight.
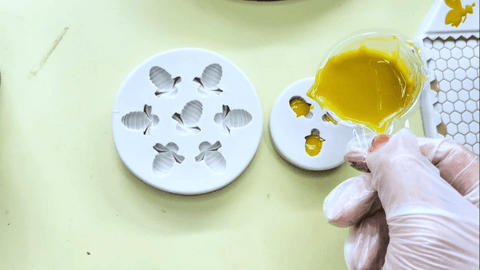
Now, follow the steps mentioned above to tint your resin mustard for your bumble bee silicone molds. Keep in mind that resin is self-leveling and will spread out across the surface so, you don’t have to worry about any irregularity in the bumble bee pattern. Set them aside to fully dry as well.
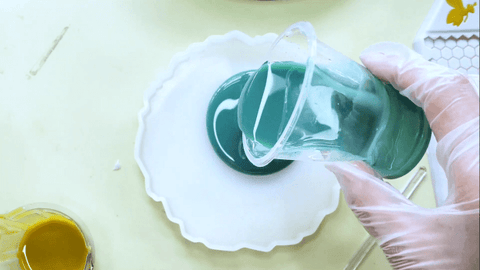
Now, it’s time for the third mold that is zigzag round tray silicone mold. This component of your project will act as the base for other components and your phone. For this mold, take teal mica powder, mix it in the resin, and pour the mixture in the tray. Make sure that you only fill the tray to the middle point and leave some space for the final resin layer that will add the finishing touch.
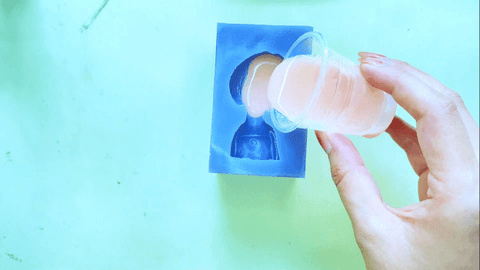
For the fourth, bubblegum girl mold, you need to use two different tinted resin mixtures. For the balloon portion, tint your resin with mustard alcohol ink to give the bubble, inflated out of the mouth, a translucent look. Let the base layer set for about three to six hours. Once the balloon portion gets a gel-like consistency, pour over the final layer for the girl portion of the mold. For this part, use baby pink mica powder in the resin, mix it well, pour it in the mold, and set the mold to cure for about 24-hours.
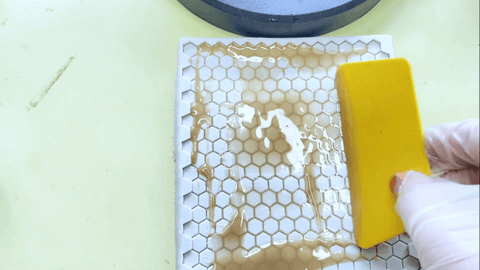
Once your honeycomb mold is ready to use, carefully demold the honeycomb pattern and cut it into half, or according to the size of your fifth mold that is the cylindrical cup, with the help of scissors. Now, take the cylindrical cup silicone mold and fill it with mustard-tinted resin mixture. You should use mustard alcohol ink in the resin for the cylindrical cup to give it a translucent look as well. After pouring the resin mixture in it, carefully tuck the honeycomb pattern in the cup mold, and leave it to cure as well.

Once your resin bumble bees have fully cured, demold them and add some color to their bodies. For this purpose, take ash grey acrylic paint, and color the wings of the bumble bees. Don’t forget the bottom sides of the wings. After you are done with the wings, take another brush and use black acrylic paint to add the stripes and eye-details.

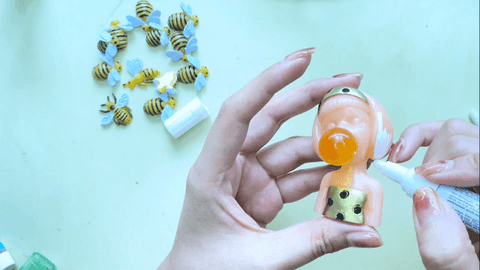
Now, demold the bubblegum girl and start adding details to it using gold, black, and white paint markers. Use gold paint marker as the base color for the dress, and the headband, and then use black paint marker to give the polka dot effect to the dress and headband, and to add eyelash-details. After that, use white paint marker for the hair.
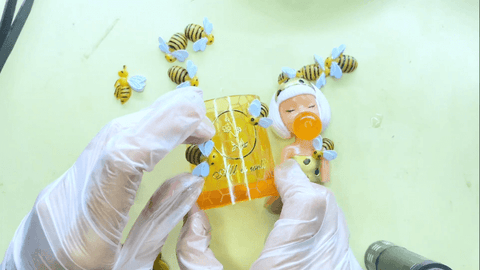
For this part, demold your cup and start adding some finishing touches to your resin bee phone stand components. To do this, use resin mixture to attach the bumble bees on the girl with the help of a poke needle, and use resin curing UV flashlight to quickly fix the individual components together. You can also use Q-tips to clean any mess. After the bubblegum girl, now it’s the turn of the cup to get an All is Well charm, and a couple of bumble bees attached on it. Glue a couple of bumble bees on the mini LED desk lamp as well.
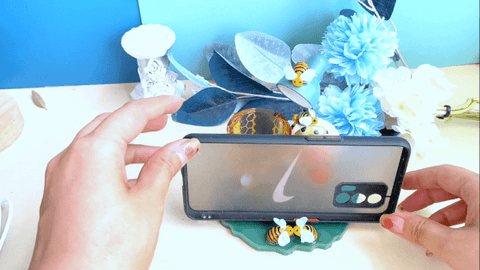
Now, when everything is ready, place the cup, the lamp, the bubblegum girl, and two bumble bees in the front to act as the support for the phone on the tray and set them where you feel they look best. Now, when you have set them at their places, pour the final clear resin layer in the zigzag round tray silicone mold to the brim. The last layer will hold everything together and give your resin bee phone stand a nice gleam. Now, you just have to leave it for 24 hours so that it can fully cure.
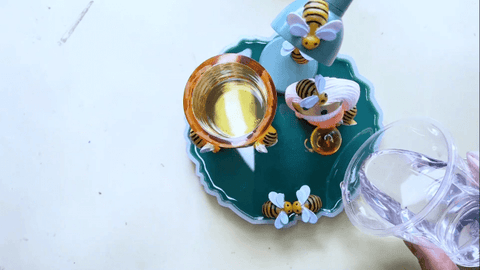
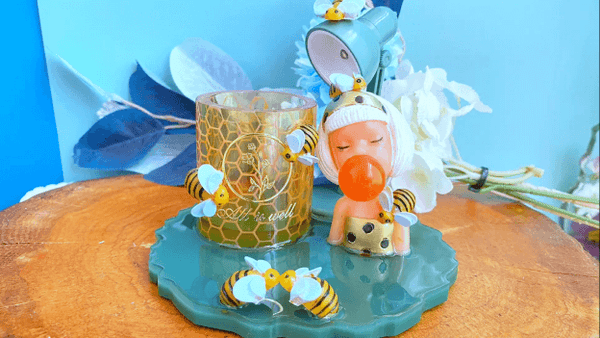
Once your resin bee phone stand has cured, you can demold it. Finally, you can use this as an incredible phone stand to put your phone on it either horizontally or vertically. Enjoy!
With this magnificent resin bee phone stand, you can now let your hands rest while the stand does its job. Make this for yourself or your loved ones and get tons of praises too. Go, and get your supplies for this wonderful resin bee phone stand right now!