
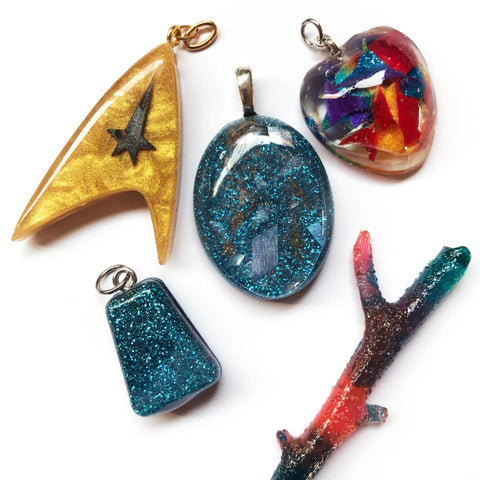
Probably the most popular thing to do with resin is to make jewelry. And one of the most popular kinds of jewelry to make is pendants. In this post, I’ll show you the three basic kinds of resin pendants and the techniques for making them. In addition, you can break down resin pendants into two main categories: The first is using a piece of art or anything else you want to showcase, and covering it or embedding it in clear or transparent resin. The second category is coloring resin and designing with it, so that the resin itself is the art.

As I show you the basic pendants, think about what you want to create. Do you want a colorful heart on a chain? A photo pendant of a new puppy? A flower floating in a frame? Each technique has its own strengths and weaknesses. I’ll go over the most important points.


Note:
I’ll also give you the basic instructions for how to make each kind of pendant. All instructions in this post are generalized to get you started. They do not specify what kind of resin to use, and they will assume that your resin is already prepared, according to product instructions.
I’ll also assume that you already have your basic supplies, workspace, and protective gear all set up. I’ll let you know about any extras you'll need for each kind of pendant.
Using Molds
If you’re not sure where to start, creating resin pendants with molds is very beginner-friendly, while still being versatile enough for expert resin artists. Molds come in almost every imaginable shape, are inexpensive, and are reusable.
Molds are pretty straightforward. Basically, prepared resin is simply poured into shaped molds to create a necklace charm or pendant. You may or may not have to add hardware or drill holes to attach a chain. Shaped cast resin, like objects, letters, and flowers all fall into this category. So do faux resin gemstones. Molds give you the widest variety of shapes and options for your pendants. They are perfect for personalizing jewelry since there are so many kinds of molds available.You can buy molds of everything from sports equipment to zodiac signs.
Note that for resin crafts the easiest molds to work with are silicone. They don’t need to be food grade, since you should never put food in a mold used for resin. In addition, if you can’t find what you want, you can even make your own molds. This is a great option if you want a mold of something you sculpted, or of a unique object like a brooch.
When using molds, the front of the pendant is face down in the mold, so you won’t see the final look until it’s cured and removed. This means you’re working top to bottom. For this reason, I prefer transparent or translucent molds whenever possible to get an idea of what my casts will look like.
Here’s how to make a molded resin pendant
1) The following mold instructions are for epoxy resin, polyester resin, or any resin that hardens chemically (without light). UV resin can be molded as well, but since light has to reach every bit of the resin it’s more complicated.
2) Decide on the mold you want to use and what you want in the resin - transparent dyes, opaque colors, mica powder, glitter, etc. The standard rule of thumb is don’t add more than 6% of the volume in pigments to the resin or it may not cure properly. Most colorants are very saturated, so this generally isn’t a problem.


3) Mix up whatever colors you want in separate cups. If you want the colors to be distinct, set them aside for 10-20 minutes, until the resin thickens. The thicker the resin, the more distinct the colors, but if you wait too long the resin will harden too much and won’t pour properly. A little thicker than honey is a good consistency.
4) Make sure your mold is sitting flat. Then pour some resin in your mold. Start with one color. Then you can get artistic, adding other colors, and swirling them with a toothpick if you want. You can also sprinkle a dash of glitter into the mold and stir it in gently.
5) Whether you used one color or many, fill your mold to the top. Use either more of the colors you’ve already mixed, or top off with some clear resin.

6) If possible, cover your mold with a box to keep dust out of the pendants. Leave the mold undisturbed until the resin is well set. If you’re not sure how long, leave the mold overnight.
7) When the resin is fully cured and not tacky at all, remove the hardened pieces from the mold.
8) Younow have charms for your pendants. If your mold created holes in your pieces all you have to do is add a jump ring or chain. If your mold created solid charms, you need a way to hang them and turn them into pendants. The two most popular ways to hang solid pendants are either to drill a hole and add a screw eye to the hole with a dab of glue for security, or to glue on a pendant bail made just for this purpose. Good glues to use for either method are E-6000, or G-S Hypo Cement.
Using Bezel Trays (Resin Trays)
A bezel tray is basically a little tray that has a backing and sides that come up just a few millimeters. Resin trays are usually metal, and generally have a loop already attached for adding a jump ring or necklace chain. They come in a variety of shapes and sizes for making pendants. Resin trays are generally used by adding something to the bezel and covering that item with clear resin, making it permanent. Bezel trays are a great way to frame a resin pendant. They are not see-through because the backs are solid metal.

With bezel trays the front of the pendant is the face up and you can see exactly what your artwork will look like. The tops of these pendants are generally domed. Doming is a nice finishing touch. One bezel tray makes one pendant and can not be reused.
Here’s how to make a bezel tray pendant
1) Decide what you’re putting in the tray. You can paint the inside of the tray with acrylic paint, or add a photo or something you print out (like my Shakespeare quotes). You can also add small objects like beads or tiny charms, stickers, scrapbook paper cutouts, or anything else you like. Get creative!
2) If you're using paper, it has to be sealed. Mod Podge is perfect, but any glue that dries clear will work. School glue is fine. Let the sealer dry.


3) If you’re painting, wait for the paint to dry completely before the next step. If you’re using paper or a photo, cut it out to fit the bezel and then glue it in place.
4) Add anything else you want to the tray, like beads or glitter. You can glue these in so they don’t float around when you pour in the resin. Wait for the glue to dry completely before the next step.

5) Make sure your tray is level. Then slowly add prepared clear resin. Fill it to the top of the tray.
6) Doming. This is the tricky part, but it makes your pendant look professional. With a toothpick add ONE drop of resin at a time to the center of the liquid resin. Try not to poke the surface or disturb the tray in any way - just drip the resin in. Surface tension will keep the resin from spilling over the edges, but only up to a point. Go slow, be careful, and when you see the dome form, stop adding drops.
7) Cover your tray with a box to keep dust out of the pendant and leave the tray undisturbed until the resin has completely cured. If you're using UV resin and a lamp, move the lamp, not the tray, and cure.
8) If your pendant tray has a loop, add a jump ring. If it has an attached bail, it’s done.


Using Open Bezels
If you want a transparent pendant with a frame, you can use an open bezel. Since these are basically backless borders, they’re a little trickier to work with, but the results are beautiful. Open bezels usually have a loop already attached for adding a jump ring or necklace chain. They come in fewer shapes and sizes than trays, but you should be able to find a decent assortment online. Open bezels are usually deeper than trays.

If you want an object to appear to float in your pendant, open bezels are perfect. If you’re using opaque objects or colorants that will fill the entire frame, consider choosing a mold or tray instead.
When using open bezels, either side can be the front and doming the top is up to you. One open bezel makes one pendant and can not be reused.
Here’s how to make an open bezel pendant
1) Prepare your bezel by giving it a temporary back. The easiest way to make a backing is to stick the bezel to a piece of packing tape. Cut a piece of packing tape that's larger than your bezel. Then press the back of your open bezel to the sticky side of the tape. Run your finger along the smooth side of the tape to get a good seal. The most important part is that there can’t be any gaps between the bezel and the tape or resin will leak out. If you think there might be gaps, run a line of school glue (like Elmers) around the OUTSIDE edge where the tape meets the bezel. Make sure the glue is 100% dry before adding resin.
2) Next add a bit of clear resin to the bottom of the bezel (onto the packing tape) and spread it to the edges with a toothpick. Note that how high you fill the bezel will determine where your objects appear to float. You can let the resin thicken or set all the way, depending on whether you want to place your objects into, or on top of, this resin layer. You can also come back anytime in the future to fill the open bezels the rest of the way.
3) When the resin is set the way you want, add whatever you plan to float in the pendant. I added dried plants and gold chips. It may help to use tweezers or toothpicks to position tiny objects.

4) Then carefully fill the bezel the rest of the way with clear resin. If your objects float, push them down with a toothpick.
5) Let the resin cure 100%.
6) Carefully peel off the packing tape and glue, if you used any. If the tape left any tackiness, wipe it clean with alcohol. School glue residue can be washed off with water.
7) Now just add a jump ring or chain and it’s ready to wear.

Ready to Make Pendants!
Molded pendants, tray pendants, and open bezel pendants are some basic building blocks of jewelry making. With the previous three sets of instructions you now have the information you need to decide on what kind of pendant you would like to create and start making your own unique jewelry. Once you get started, you’ll see the possibilities are endless. You can combine techniques, experiment with embedding different objects, use different kinds of colorants, and try different opacities of resin. Pendant making is also a great way to start using resin before you go onto larger projects because pendants require a minimum of supplies to get started. If you want to learn more about resin or you need a list of supplies, please check out our Getting Started Guide here.