
Resin trays are custom trays made from molding Resin. These trays are unique, affordable, stylish, and just the perfect gift. Owning or making these DIY trays is a perfect way to add style, interest, flair, and a custom touch to your room décor or your kitchen. The resin provides endless possibilities for you to customize these trays and suit them with your style. Whether you are working with Silicone, metal, or wood, the Art-resin would not stop you from getting creative.
Quick Link [hide]
DIY Resin Tray Ideas
With IntoResin, there is no limit to your creativity. You create stylish, creative, and beautiful trays by combining them with different materials and creating different shapes. You can do endless experimentation, from selecting the pigments and glitter to selecting the handles. In this article, I will discuss three different types of DIY resin trays you can easily make. They are not expensive to make and do not take much time. The required material is easily available at stores or can be ordered online. The three trays are:
- DIY Dried Flower Resin Tray
- DIY Ocean Wave Resin Tray
- DIY Glitter Red and White Tray
By blending resin with dried flowers, glitter, pigments, stones, and stickers, you can create different types of trays. It is all under your control, from the shape to the pigment, from handles to the sticker, from stones to the number of materials. So, get creative and create what you want and how you want to create it!
DIY Dried Flower Resin Tray

The first tray that I will discuss is the Dried Flower Resin Tray. I will walk you through the materials needed to make this tray and the steps involved. Chronologically and keenly follow the step-by-step instructions. Making a Dried Flowers Resin Tray is easy and affordable. The materials can be easily found at the market, and the trays add style, charisma, creativity, and homemade touch to your home décor and kitchen. If you are not sure about a gift you are to give, this Dried Flower Resin Tray is just the right and unique gift.
Materials Needed
You need the following materials to make a custom, unique, and stylish DIY dried resin tray.
- Epoxy Resin
- Tray Mold
- Dried Flowers and Leaves
- Stickers (You can choose any sticker according to your liking.)
- Glue Gun
- Handles
- Tweezer
Now that you have a clear idea and the materials you will need to make this unique product, I will guide you through the different steps involved in this process. By following these steps, you can easily make a unique, transparent resin tray with pretty dried flowers in the comfort of your home.
1. Assemble and Arrange Your Materials Carefully
This way, you will not misplace the materials and apply them just on time. Since you need to apply the materials at the right time and the placement also needs to be right so, do not ignore the importance of this step.
2. Pour First Layer Resin into the Mold
It would be the best if you were careful so that you don't split it outside. Also, make the poured resin regular and balanced so that the surface of your tray is also regular and flat. After this step, let it cure for a minute, and get ready to add the pressed flowers and leaves.

3. Start Adding the Leaves and Flowers
After the resin is getting sticky, use a tweezer to add the flowers and leaves to the poured resin because the dried flowers and leaves are very fragile, and you need to place them carefully. Also, try not to pluck any holes or cause any damage to your poured resin.
- First, take out the leaves with the help of a Tweezer and add them to the top left corner of the Resin-poured silicon mold.
- Next, take the flowers and carefully place them on the leaves. To add variety and diversity, you can choose different kinds and colors of flowers.
- Repeat the same two steps for the bottom right corner.
- Next, carefully add the leaves to the center of the silicon mold. Make two balanced and stylish layers of the leaves and add flowers on the top.


TIP: An easy way to find pressed flowers and leaves is to order them online. They are very convenient to use and are already pressed, so you do not need to press them via a microwave oven or other methods. Nevertheless, a cheaper alternative is to dry your flowers. Although, they might not look as pretty and perfect as these do.
4. Use Some Stickers as Decoration
To add the stickers on the resin, make sure your resin is cure completely. Since this one is a wedding day gift, I have chosen a wedding day sticker, and you can choose according to the occasion too. To make the tray more customized, add creative butterflies with the leaves. The small one goes on the leaves and the big one in the left bottom corner just above your handles.

5. Glue the Handles
First, apply glue on both ends of the handle and place it carefully on the corner of the poured resin. Try not to misplace the flowers or disturb the flat area of the Resin surface. Repeat the same steps for the next handle.

6. Coat Resin to the Top
For the final step, carefully pour the resin to the top in a balanced way to get a smooth and regular surface on the tray. The overall shape and perfection of the DIY dried flowers resin tray depends on this step.

After completing the steps mentioned above, let the resin cure for at least a day or two and then remove the silicone mold, and there you have it. Your custom-built Dried Flowers Resin Tray is ready to use.
DIY Ocean Wave Resin Tray

In this section of the article, I will discuss the process of a DIY ocean wave resin tray. I will guide you through the materials needed and the steps involved. The tray is easy to make and the process and all the materials required are affordable as well. The materials can be easily found at the market, and the tray adds style, charisma, creativity, and homemade touch to your home and your décor.
Materials Needed
You need the following materials to make a custom, unique, and stylish Ocean Wave Resin Tray. These materials are easily available on the market at an affordable rate.
- Epoxy Resin
- Tray Mold
- Blue and White Pigment
- Stickers and Stones
- A Hair Drier
- Heat Gun
- Handles
Now that the list of required materials is clear and you have a general idea of an ocean-theme tray, let’s proceed towards the general procedure to make this stylish and unique product.
1. Assemble all the materials
The first step involves carefully assembling and arranging all the materials on your desk. This way, you will not misplace the materials and apply them just on time. Since you need to apply the materials at the right time and the placement also needs to be right so, do not ignore the importance of this step.
2. Pour Resin into the Mold
This step involves pouring the resin into the tray mold. It would be the best if you were careful so that you don't split it outside. Also, make the poured resin regular and balanced so that the surface of your tray is also regular and flat.
- Pour the first layer of resin that was mixed with sand.

- Pour the second layer at the extreme left in a top-bottom manner. The pigment can either be dark blue or sky blue.

- Pour the third and fourth layer into the center. If you used the dark blue pigment at the right, then use sky blue in the center and vice versa.
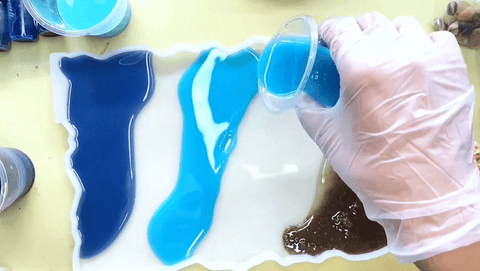

- Add shaped stones and other materials of different shapes and designs. I have used stones to blend it perfectly with the ocean theme. Place them carefully at the sand layer.

3. Form the Ocean Wave
It's the hardest part and easy to get failed. It would be better if the resin gets a little sticky, and then try to use your blower to blend the white resin. Add more layers of resin pigments and blend them using the blower until you get the perfect ocean wave shape. The outcome of beauty and shape is dependent upon the blending of colors.

After completing the steps mentioned above, let the resin cure for at least a day or two so it will cure completely.
4. Add the Handles
The resin is cured now, and is ready to set the handles up. Apply glue on both ends of the handle and place it carefully on the corner of the poured resin. Repeat the same steps for the next handle. You can choose handles of your preferred material, shape, and color. And now remove the silicone mold, and there you have it!

DIY Glitter Red and White Tray

The next tray on the list is the DIY Glitter Red and White Tray. In the following section, I will give you a comprehensive list of materials involved in making a Glitter Red and White Tray. I will also guide you through the step-by-step instructions.
Materials Needed
You need the following materials to make a custom, unique, and stylish Glitter Red and White Tray. These materials are easily available on the market at an affordable rate. You can also order them online from sites like Amazon etc.
- Epoxy Resin
- Tray Mold
- Red, White, and Pink Pigment
- Silver Glitter
- Plastic Cups
- Stirring Stick
- Tweezer
- Finger-cot
- Heat Gun
- Stickers/Quotes
- Handles
1. Prepare the Resin and Glitter
In the first step, pour the pigmented resin and glitter into separate containers. Mix the pigmented resins well. Add the quantity of the pigment according to the color you want. If you want darker colors, then add more pigment to the resin. You need to make a few separate containers of resin.
Next, carefully assemble and arrange all the materials on your desk. This way, you will not misplace the materials and apply them just on time. You need to apply the materials at the right time, and the placement must also be right. Do not let the resin cure completely. This may diminish the beauty and leave distinctive marks on the tray.
2. Pour the Glitter and Pigmented Resin
You can make diagonal layers circular and round, etc. You can also adjust the quantity of each color and glitter according to your liking. If I have chosen one layer of Red, you can try to choose two consecutive layers of Red.
Follow the instructions below to get the perfect customized red and white glitter tray.
- Horizontally pour the first layer of Glitter in U-Shape.

- Then, add a layer of red pigment but make a slightly bigger shape.

- Again, add a thin layer of silver color paste.

- Next, add a thin layer of white pigmented resin.

- Then add a red layer, then glitter, and then the white layer. Repeat these layers until you have filled the whole surface of the Silicone Mold.

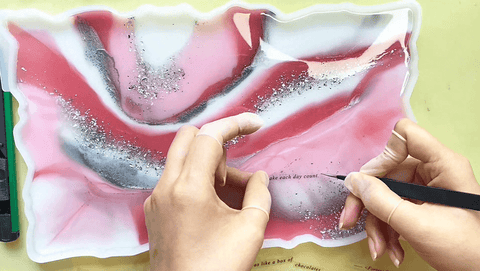
3. Add a Quote or a Sticker
After the resin is cured completely, paste any stickers or quotes that you like on the surface of the resin tto make it more stylish and captivating.
4. Add the Handles
You need to use the heat gun to apply glue on both ends of the handles. Repeat the same steps for the next handle and make sure they are aligned.


5. Pour Another Coated Resin
Coat another well mixed resin on top to make sure the surface clear and smooth and the handles can be bonded firmly.

Conclusion
Thanks for sticking to the end of the article. After reading the article and the instructions mentioned above, I hope you now have a clearer idea of the materials and steps involved in making DIY Resin Trays.
You can create a stylish and unique tray by blending different pigments and glitter with resin. No one can resist the charm of such beautiful and intriguing trays. But for that to happen and to perfectly make a stylish, custom Resin Tray, you need to chronologically and carefully follow all the steps mentioned above. Each step is important along the way.
3 comments
Thanks so much for the educated tip. I’m ready to get started.
I’m wondering how much resin was needed for the dried flowers tray?
Hi
Thanks for writing such an informative blog which will surely be a great help to the readers.
I’m interested in reading your article, and your content is on point. Well done to the team.
Either way, keep up the awesome work!
Best Regards
Alice:https://zetarmold.com https://zetarmoulding.com