
Christmas is arriving soon, bringing with it lots of excitement and enjoyment. While you are planning all sorts of activities for this beautiful day, don’t forget to add something creative to your list. This time, put your resin expertise to test and start a special project!
This Christmas season, give up on ordinary Christmas decorations and bring on the fun with the exciting 3D resin Christmas tree project. Ask your family to join in on the fun too by helping you with the project. This special time together with your loved ones is definitely going to make your Christmas extra special and memorable for years to come. So, don’t wait till the last moment and scroll down to find the list of supplies needed for this project and the instructions that you have to follow to turn this resin project into a reality.
Supplies Needed
Following is the list of things you need to make your glowing resin Christmas Tree:
- 3D Christmas Tree Silicone Mold
- Epoxy Resin and Hardener
- Bottle Green and White Mica Powder
- Chunky Iridescent Glitter
- UV resin
- Mini LED Button Light
- Resin Curing UV Flashlight or Mini UV Light
- Hot Glue Gun
- Small Spherical Button to Act as a Base
- Mixing Stick
- Iridescent Sheet
- Toothpicks
- Circular Plate
- Gold Sphere Chain
- Ball-tip Needle
- Colorful Gems
- Tweezers
- Small Gold Decorative Butterfly and Moon Shapes
- Small Cups
- Gloves
Step-by-step Instructions
Below are the detailed instructions that you need to follow to make a bewitching Christmas Tree:
Fill the Molds with Resin
Take your 3D Christmas tree silicone mold and fill it with green resin mixture. When you are preparing this mixture, add some chunky glitter in it as well. Use a mixing stick to blend the glitter in the resin nicely to avoid the formation of lumps.
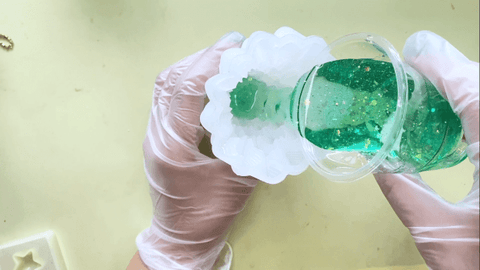
When you are filling the tree mold, squeeze the silicone mold slightly to ensure that the resin reaches the innermost points, and no crevice is left behind. Leave some space in the tree mold keeping in mind the size of your mini LED button light that will go here.

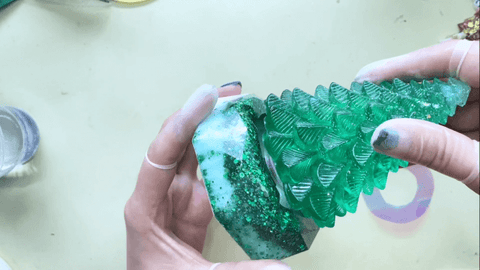
Take the base mold and fill it with two different resin mixtures. Half of the base mold should be filled with white resin mixture while the other half should be filled with glittery green resin mixture. Leave the two molds to cure for about twenty-four hours.

Attach Mini LED Button Light
Once your molds have fully dried, take the tree mold and attach the mini LED button light to it. You will do this by taking some UV resin and putting a drop of it on the cured resin tree base.

Secure the bulb part of your mini LED button light to the tree firmly.

When the light stay in place, add more green resin mixture to fill the mold to the brim, avoiding covering the button light.

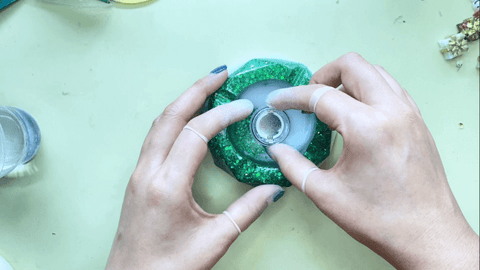
After the tree mold is done, demold the base and attach the battery part of the button light to it.

Here, you can demold the Christmas tree as well.

Use a small, spherical button that will act as the base for the battery part of the button light. Attach the battery part on one side of the spherical button using more glue with a glue gun.


Fix the flat side of the spherical button on the base with some glue.

At this point, make sure that your button light is working properly before finalizing the project. If its fine, move on to the next step.
Pour some clear resin mixture in the cavity of the base, add a circular iridescent sheet, and pour some more resin mixture to seal the sheet and encircle the battery part of the button light.


Attach Accessories
Begin by attaching a gold sphere chain to the 3D Christmas tree with the help of some UV resin. For this part, pour some glue on a small circular plate because you’ll be coming back to it.

Confirm the position where you want to begin your chain.

After positioning it in the right place, use a ball-tip needle to rub some glue on the attachment point.

Use a resin curing flashlight or a mini UV light to expediate the process.

Wrap the chain around the tree while adding glue to it at regular intervals with the help of the ball-tip needle to fix the chain in place.

Once you have attached the chain round the tree, you can start attaching some colorful gems to it. Use tweezers to dip the gem in the glue on the circular plate and then place it on the tree.


Again, use a mini UV light to dry these gems as well.

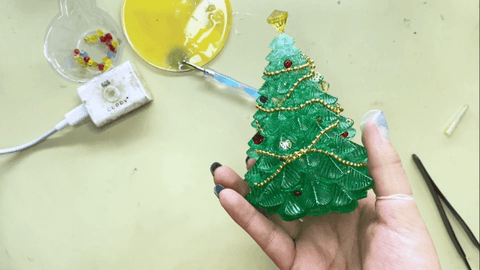
Repeat the same process to add more gems and small gold decorative butterfly and moon shapes to the 3D Christmas tree.


Finally, use a bigger yellow diamante at the top of the tree. Make sure you use enough UV resin around the diamante and dry it nicely with the help of the mini UV light so that it doesn’t fall off.


Decorate Your Home with Your Christmas Tree
Now that your Christmas tree and base is ready. You can attach the two components together to bring your 3D Resin Christmas tree to a glow.

Place the tree in your lounge or in your children’s room to make this Christmas even more special for them.

You can bring in all the mini Christmas tree decorations you want for your home but if your Christmas tree does not glow, there isn’t much that’s special about it. So, what you can do about this situation is that you make your own Christmas tree that glows! Making it with resin will add more fun to your Christmas project while giving you the freedom to style it however you want.
It’s time to get your hands on your 3D Christmas tree supplies right now to make your home light up with the beautiful glow of your Christmas tree made out of resin.