

Epoxy resin is a fantastic substance that allows you to let your imagination run wild whenever you become creative. Do you wish to create a beautiful epoxy resin cell phone stand? continue reading this article!
In this post, we will cover a step-by-step guide to craft a resin carousel night light from scratch without any hassle.
Before you begin making your gorgeous new phone holder, ensure sure the environment is level, clean, aired, and clear of dust or hair. To prevent Resin from getting into touch with your area and creating an extra mess, you may try covering it with something like wax-lined paper or newspaper.
In this article, you will learn how to make a resin cell phone stand with epoxy resin from scratch.
1. The Supplies You'll Need to Make a Cell Phone Stand
1.1 Materials needed
If you want to replicate this phone stand DIY, here are the supplies you'll need to realize an epoxy cell phone holder.
- Color Pigment
- Epoxy Resin
- Paint
- Glitter Flakes
- Stickers
1.2. Tools Needed
- Stirring stick
- Toothpicks
- Molds
- Mask
- Gloves
- Hot Glue Gun
- Measuring Glass
- Plastic Cups
2. Step-by-step Tutorial
2.1. Mix the Epoxy Resin with Color Pigment
Use a plastic cup half-filled with epoxy resin and pour a few drops of blue. Mix the contents with a stirring stick until the color becomes homogeneous. Keep pouring drops of blue until you reach a light, turquoise blue.
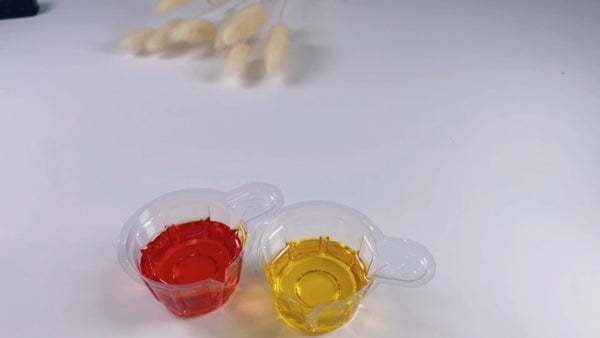
Take two small plastic containers and fill them with epoxy resin. Pour in one of them yellow pigments and mix well. In the other one, pour some red and yellow pigments and mix them as well to create a beautiful orange color.
2.2. Paint the Christmas Tree
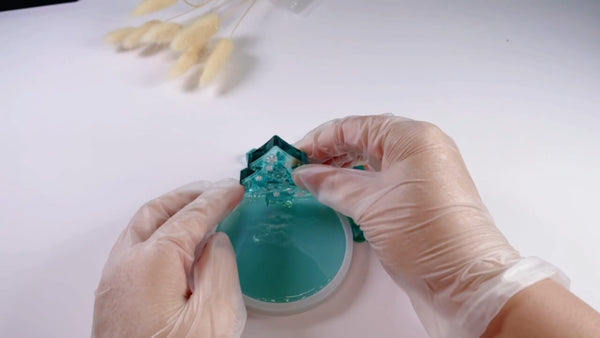
Put some white paint in a container and use a toothpick to paint the snowflakes inside of the mold white. Be very careful when doing this so you don't exceed the edges. Mix a few silver glitter flakes with clear epoxy resin in a recipient. Use the mixture to paint the reindeer inside of the tree with a toothpick.

2.3. Pour the Epoxy Resin
Take the blue resin that you mixed in the first phase and pour it into the Christmas tree mold, and then into the circular mold. Let it rest. Take the blue and yellow resin recipients and pour them into the diamond shape mold. Pour two yellow diamonds and six blue diamonds. Pour two orange globes and three blue globes into the mold. Let the molds rest until the resin dries up.

2.4. Remove the Decorations from the Molds
Start by removing the tree from the mold carefully. Continue removing the diamonds and globes from the molds and start preparing your assembling table.

2.5. Place the Christmas Tree on the Circular Base
Carefully place glue on the bottom of the tree root and glue it to the edge of the circular base facing outwards.
2.6. Glue an Orange Globe on the Top of the Tree
Put a bit of glue on the bottom of the globe, using the hot glue gun, and carefully stick it to the top of the tree. Hold the ball with your hand until the glue hardens to prevent it from peeling off.

2.7. Place the Other Pieces Arbitrary on the Base
Start by placing the larger pieces on the edges of the circular base, going with smaller and smaller pieces towards the middle. Also, glue them with the help hot glue gun. Leave the middle of the base empty for the text sticker.

2.8. Place the Text Sticker
Using tweezers, gently peel off the sticker from the protective foil and glue it lightly to the circular base. Try to place the sticker as central and straight as possible for a more pleasant appearance.

2.9. Seal the Base with a Layer of Clear Epoxy Resin
To ensure that everything blends perfectly and will remain in the same position, pour a thin layer of epoxy resin in the center of the decoration, let the resin flow easily to the edges of the circle. After everything has dried completely, gently remove the mold from the circular base.

2.10. Enjoy your Cell Phone Stand
That's all there is to it! DIY Cell Phone Stand that is both beautiful and simple to create. Now, you can use it as a holder for your phone to give it practical use and watch your favorite videos or use it as a Christmas decoration for the holidays!

What are your thoughts? Do you like this project or would you be willing to give it a shot? Any item may be molded and cast using this approach. Let me know what you think in the comments, and thanks for reading!