
Pen holders are not only functional but also delightful accessories to have on your desk. Although, you can find a variety of pen holders in the market, they would not be as special as personalized resin pen holders you make for yourself, keeping your needs and requirements in mind. So, scroll down to find the supplies needed and instructions you need to follow to create your pen holder.
Supplies Needed
- Silicone Pen Holder Mold with Base Plug
- Epoxy Resin and Hardener
- Purple Mica Powder
- Plastic Sheet as Base (for working with glue on it)
- Glue
- Shaker Tubes with End Caps
- Mini Caviar Beads
- Quicksand Oil
- Holographic Chunky Glitter in Assorted Colours and Shapes
- Plastic Cap
- Resin Curing UV Flashlight
- Small Plastic Cups with Spouts
- Gloves
Step-by-Step Instructions
- Prepare the Shaker Tubes
To begin with this artistic project, you will need to prepare your shaker tubes first. Start by using any plastic sheet as base to avoid creating mess on your workspace, and squeeze some glue from a dropper bottle on it.

Take a shaker tube and cover its one end with the glue, and then fix the cap on this end.

Use the other opening of the tube to fill mini caviar beads in it.

Fill the tube with quicksand oil using a dropper bottle and secure this end with the cap as well.

For the shaker tubes, you can either use clear quicksand oil or give it some colour using mica powder.

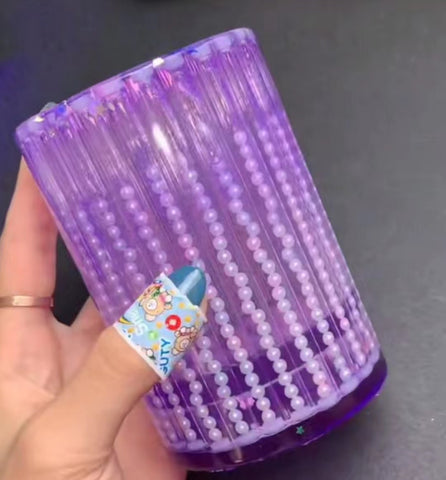
- Fill the Silicone Pen Holder Mold
Fill the rim of the pen holder by pouring a mixture of assorted chunky glitter in purple-tinted resin as the base layer. Let this layer get a gel-like consistency by leaving it for about 3 to 6 hours. This will help the shaker tubes get a firm grip in the cavity of the holder.
After sufficient time has passed, fill the mold with your shaker tubes.

Use a small cup with spout to pour purple-tinted resin in the mold.

Here, you will need to lightly squeeze the mold a few times to allow the tinted resin to settle in the mold and get rid of any air bubbles. Keep in mind that you need to leave some space and fill it only slightly above the inner bottom of the mold.

After the resin mixture has fully settled, fix the base plug in the cavity. If, after adding the base plug, there is not enough resin in the mold to completely submerge the shaker tubes, you can add more but it should not go over the base plug. Leave the mold overnight so it can fully cure.
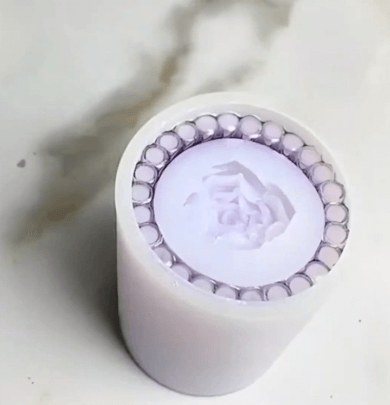
- Prepare the Base of the Mold
After your mold has fully cured, take out the base plug.

Use an assortement of chunky glitters and pearls in the cavity and pour some quicksand oil in it.

Apply glue over the shaker tubes and fix a plastic cap on it to seal the glitters in the base. Use a UV flashlight to expedite the process of drying the glue and helping the plastic cap attach firmly.


Pour purple-tinted resin in the remaining base cavity and let it sit overnight to fully cure.

- Demold the Pen Holder
Once your pen holder has fully cured, you can carefully demold it.


You can now use it either for yourself or give it to your loved ones as a beautiful gift.

If you or someone you know has to use pens in your daily work, resin pen holders can be a great project to work on. So, get the supplies needed to make your beautiful, personalized pen holder and start with this exciting project right away. Don’t forget to use your gloves while working with resin for safety!
4 comments
@Mary Ann Nikolaus Could you please share more info about the bumps and striations with us so we can help?
@Glenda Jones Thank you so much! Hope you find it helpful.
Thank you;