
This time, get your pets something made with your own hands out of pure love. Resin dog tags can be a great gift for your pets so, scroll down to find how you can make them at home.

Supplies Needed
Following is the list of supplies you require to make your DIY resin dog tags:
- Silicone Dog Tags Mold
- Epoxy Resin
- Image of Your Dog
- Chunky Multi-color and Iridescent Glitter
- Black Mica Powder
- Small Golden Alphabet and Special Characters Sticker Pack
- Large Golden Alphabet Sticker Pack
- Mixing Spoon
- Mixing Stick
- Toothpick
- Tweezers
- Black Ribbon with Golden Border
- Small Cups with Thin Spouts
- Gloves
Step-by-step Instructions
Fill the Dog Tags Mold with Resin
First of all, to start making dog tags for your beloved pet, add clear resin mixture as the base layer half-way through the dog tag molds.

Then, take a cup with clear resin in it and add some chunky multi-color and iridescent glitter in it.

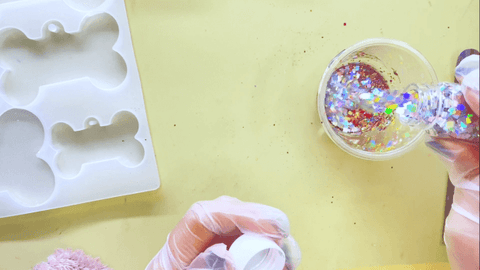
Mix these components well with a mixing stick to get a smooth texture.

Now, pour the glitter mixture in the smaller dog tag and leave it to dry.

Create Swirling Patterns
Now, take some black resin mixture and create some swirling patterns in the bigger dog tag mold with the help of a toothpick. Toothpick helps you manage the quantity of the resin that you need to add.

You can also use a small cup with thin spout to pour thin threads of resin in the mold.

Then, again use a toothpick to spread those threads of resin so that they fill the empty spaces in the mold with more swirling patters.

Now, leave the mold to cure overnight. Usually, resin takes about twenty-four hours to fully dry so, you have to be a bit patient.

Demold and Add Details to the Dog Tags
Once your dog tags have cured, gently demold the bigger one first to start adding details to it.

Take the sticker image of your dog and attach it to the designated circular space on the tag. Make sure that you get your dog image according to the shape on the dog tag mold so that you don’t have to face any inconvenience if you get a different image shape. And also take the small golden alphabet sticker pack to add your favourite message or quote on the tag.

Use tweezers and toothpick for more precision and neatness.

Afterward, take the special characters sticker pack to add more elements, such as hearts and gender symbol, to the dog tag.


For the second, smaller dog tag, use large-sized golden alphabet sticker pack to write the name and date of birth of your pet on it.


Seal Everything in Place
Next, you need to add some more clear resin mixture as the final, top layer over your bigger dog tag to seal everything in place firmly.

As you have already demolded your dog tag, you need to be careful when pouring the top resin layer. For this purpose, you must use a small quantity of the mixture and then spread it across the surface evenly using a toothpick.

For the smaller dog tag, pour the final layer over the mold with the help of a small cup with a thin spout.

Demold it once it has fully cured after about twenty-four hours.

Dog Tags are Ready for Your Beloved Pets


Your pets deserve all the love they can get. They also deserve cool and fun accessories. So, get your hands on some resin dog tag supplies now and start this fun-filled project.