
Do you see people using super cute coasters filled with fun little accessories floating in water in their homes? Do you also want those for yourself? Well, what if we told you that you can make those yourself! Scroll down and you will find the supplies you need and the instructions you will have to follow to make beautiful craft water cup coasters with resin:

Supplies Needed
Following is the list of things you require to create your resin craft water cup coasters:
- Water Cup Coaster Silicone Molds
- Color Mixing Mold
- White, Gold, and Silver Mica Powder for Dry-brushing
- Q-tips
- Sky Blue, Dark Brown, Dark Green, Coal Black, Forest Green, Electric Blue, and Persian Green Mica Powder
- Epoxy Resin and Hardener
- White Paint Marker
- Gold and Silver Glitters of Different Shapes and Sizes
- Craft Water
- Ball-tip Needles
- Resin Curing UV Flashlight
- Needles
- Dropper Bottle
- Tissues
- Dropper
- Mixing Spoon
- Small Cups with Thin Spouts
- Gloves
Step by Step Instructions
Below are the detailed instructions that you need to follow to make your craft water cup coasters with resin:
- Dry-brush and Pour Resin Mixture
For this project, as there are several components, you will be working with small batches of resin for the different components. To make your craft water cup coasters, you first need to start by lightly dry-brushing some white mica powder in the ice cube molds with the help of q-tips. Make sure that you get the corners too.

Next, you will pour sky blue-tinted resin mixture in the ice cube portions of the mold.

This is done to add subtle shine to the ice cubes and give them a realistic look.

You can pour resin mixture, side by side, in the other molds too so that they can dry at the same time. For the front, add clear resin mixture to the cup mold that will act as the screen of the cup.

Then, you will also need to dry-brush coffee beans and circular beads with some gold mica powder before you add dark brown-tinted resin mixture to them.

Don’t forget to add brown tinted resin into the two circular parts of the mold that will act as dried orange peels. The less mica powder you add to the resin mixture, the lighter color it will give and the more translucent it will be.

Then, you will need to take a color mixing mold and add dark green and coal black resin mixture in separate grids and then tip the mold to mix both the colors as they pour down into the cup holder mold turning into an irregular mix of both the colors. You can take these molds with multiple grids if you like playing with colors and creating unique combinations.
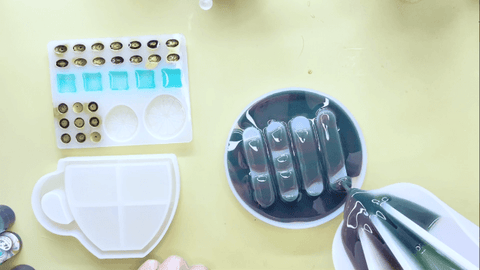
After this, take dark brown resin mixture and pour it into the cup mold that will act as the wall of your project.

Once all the components have fully cured after about twenty-four hours, you can demold them and move to the next step.

- Place the Different Components in the Cup
After demolding all the components and adding details to the dried orange peels with the help of a white paint marker, you can place the components into the cavity of the cup that will act as the wall. You don’t have to fill the cavity completely, only add the number of components that you think is enough.

Then, add gold glitter of varying shapes and sizes with the help of mixing spoons.

Once you feel the components are in the right place, you can take some clear resin mixture on a plate and apply thin layer of it to the edges of the cup with the help of a ball-tip needle to seal the cup.

- Add Craft Water
Before you seal the cup with the transparent screen, add some craft water to the cavity with the help of a dropper. The dropper helps you control the quantity of the craft water you add at a time; otherwise, you can mess up everything if you suddenly pour too much craft water.

Use your resin curing UV flashlight to dry the resin and fix the transparent screen in place.

Now that the screen has been fixed firmly, take a needle fixed on the dropper and poke it through the seal. Squeeze the dropper to add more craft water to the cavity, but don’t fill it to the brim.
- Seal the Hole
After filling the cavity with craft water, clean the hole with a tissue and fill it with some resin with the help of a ball-tip needle.

After filling the hole with UV resin, use UV flashlight to seal the hole as well so that it doesn’t keep on leaking.

- Repeat the Process
To make a pair of the craft water cup coasters, repeat the process mentioned above. For the second cup coasters project, you can opt for different colors and different methods. For example, if you primarily used gold and dark brown mica powder for the first cup, use silver and green mica powder for the second cup for contrast.

If you used small cups with thin spouts, for the first project, to pour the resin mixture in the smaller components and found it harder to do without overflowing the cavities, you can use a dropper to control the quantity this time.

For the second craft water cup coasters project, you can also use different shades of the same color, for example dark green and forest green, to make it more prominent.

You can also add double shades to the dried orange slices for the second cup by first adding electric blue to its base and then pouring Persian green over it.

Add remaining ice cubes from the first craft water cup coaster project in the second one. Use silver glitter of varying sizes and shapes this time instead of gold.

- Shelve the Craft Water Cup Coasters
Once both the cup coasters are ready, you can demold the fully cured cup holder and prop the cup coasters in it.

Now, you can place them in your kitchen and enjoy the cool and shimmery look they add to it. If you use heat resistant resin for these coasters, you can even place your resin project in the kitchen to put hot things on.

When you are decorating your home with all sorts of decorations, don’t forget your kitchen. Bring home your supplies and start making your own resin craft water cup coasters right now.