
Flowers can be dried and added to the liquid polymer resin and using molds, cast into any shape for any use or occasion. Here we’ll explore the different ways you can obtain or dry your own flowers, and preserve them in resin to craft handmade keepsakes and gifts.
Quick Link [hide]
1 Why Preserve Flowers in Resin
2 What Kind of Flowers can I Preserve in Resin
4 Project Rainbow Coaster Set - Supplies You Need
5 How to Preserve Flowers in Resin
5.5 Back to Casting - 2nd Resin Layer
6 Project Coaster Holder - Different Instructions
7.1 Can I preserve fresh flowers in resin?
7.2 Do I have to seal dried flowers before adding them to resin?
7.3 Will flowers turn brown in resin?
7.4 How can I use dried flowers in resin projects?
Why Preserve Flowers in Resin?
Flowers are often a part of our most important life cycle events and carry great sentimental value. Flowers play a focal role in weddings, funerals, births, and graduations amongst many other pivotal moments. By drying flowers you can preserve those memories forever in resin.
Sentimental Creations
Here are some of the awesome and popular keepsakes you can craft with resin and dried flowers:
- Create one-of-a-kind wedding momentos by drying wedding flowers. You can use anything from a single bloom to an entire bouquet. Then preserve the blooms in resin using molds to make unique objects d’arte.
- Press flowers. Pressed dried flowers from a trip or event are light and flat, and often sentimental. They make wonderful additions to journals or scrapbooks.
- A handmade resin photo frame inlaid with petals in school colors makes a great graduation memento or gift. You can even use flowers from a graduation lei that you dry yourself.
- Preserve prom memories by drying a corsage or boutonniere. An ornament or paperweight made with prom flowers in resin can be an ideal reminder of that special evening.
Resin and Flower Gifts
However, flowers in resin are for more than just life altering events! They make excellent gifts for life’s simpler times too. Dried flowers cast in resin molds make thoughtful, unique presents for birthdays, holidays like Mother’s Day and Christmas, house warmings, baby showers, bridal showers, and so much more.
Here are some ideas for creating unique flower and resin gifts for family and friends:
- Show how much you care by casting mom’s favorite blossoms in a special resin keepsake for Mother’s Day. A beautiful resin candle holder featuring her favorite flowers can be a perfect Mother’s Day gift for a mom, grandma, sister, or daughter.
- Romantic, lacey flowers set into anything from hair clips to serving trays make exquisite bridesmaids' gifts. Each one will be a little different so each bridesmaid will feel extra special.
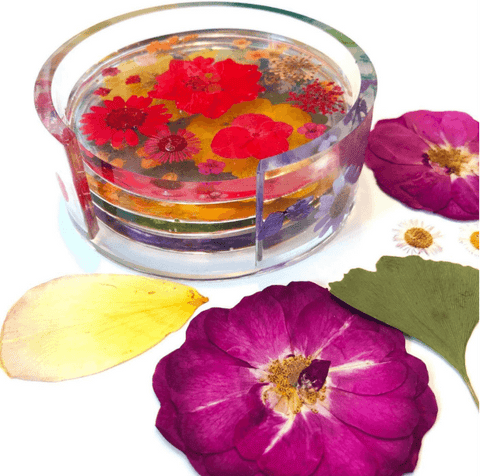
- A set of handcrafted floral resin coasters makes a unique and appreciated housewarming or hostess gift. Further in this article, I’ll give you detailed instructions to make a gorgeous set of floral coasters complete with a coaster holder.
- Birthday and Christmas gifts created from resin and dried flowers are very popular. Resin jewelry, keepsake boxes, keychains, and ornaments are just a few of the many handcrafted gifts you can create by embedding flowers in resin.
What Kind of Flowers can I Preserve in Resin?
Generally speaking, you can use either artificial flowers or dried natural flowers. Whatever you choose, the flowers must have NO moisture or your project may be ruined. More on this below.
Artificial flowers are made from many materials, though most commonly silk, plastic, other fabrics, or paper. The advantages of artificial flowers are that the colors are usually more vibrant, they keep a “fresh flower” shape, and they are already dry. The disadvantages are that they don’t look as natural, and they don’t have the sentimental value of real flowers. In addition, they can’t be pressed perfectly flat. And while you don’t have to go through a drying process, some artificial flowers will require an extra step or two before you add them to resin. You’ll need to either seal your artificial flowers to make sure they don’t react with the resin or test one of the flowers in resin until the resin is fully cured.
Dried flowers from IntoResin are the best choice when you want more natural looking flowers in your resin projects, or want to use flowers with sentimental value. They have many advantages over artificial flowers, but you should be aware that dried flowers can be very delicate until they are encased in resin. They also need to be 100% dry before you begin. Many kinds of dried or pressed flowers can be purchased online or from craft stores, in which case moisture won’t be an issue. These look beautiful and are ready, right out of the package, to add to your resin project.
However, the most personal projects, such as preserving prom or wedding flowers, require you to dry your own flowers.
Here’s an overview of the standard ways to dry your own flowers for resin crafting:
- Pressing (takes weeks) - Pressing flowers is one of the oldest, cheapest and most environmentally friendly ways to preserve blossoms. It is done by simply layering your flowers between paper or cardboard in a screw-down flower press, or between the pages of a book with another heavy book on top. Then you just wait until your flowers are dry and flat. This method is perfect for journals, scrapbooks, and other flat projects. Some flowers will keep their colors nicely, and some will lose color and have a more vintage look.
- Silica Gel (takes days) - Setting blossoms into silica gel or silica sand gives good results for retaining color and shape. Silica removes moisture from flowers without flattening them, so is better than pressing for 3-D resin projects. Disadvantages to silica gel are that it is pricey, and you have to take some precautions working with it. Silica should not be breathed in.
- Borax Mixtures (takes weeks) - You can make your own drying powder by mixing equal parts borax with sand or white cornmeal. Adding some salt will help the flowers retain color. The results are similar to silica gel.
- Air Drying (takes weeks) - Air drying is exactly what it sounds like. You either leave out your flowers until they are dry, or bundle them and hang them up upside down until they're dry. Air dried flowers may lose a lot of color and may curl up, but also have the most vintage appearance. The hanging method is very popular for drying bridal bouquets.
- Microwave & Oven (takes minutes to hours) - You can use your microwave or conventional oven to speed up the drying process, but you need to watch carefully because flowers go from dry to scorched very quickly. For the microwave, you need to work 10-30 seconds at a time, checking between each burst. With the oven, set the heat as low as it goes and check frequently. The results will be similar to air drying.
- Food dehydrator (takes hours) - If you have a food dehydrator, dry flowers the same way you dry herbs, at a low heat for a long time. Make sure you only use non-toxic plants in your food dehydrator.
See more details here if you'd like to learn how to dry flowers.
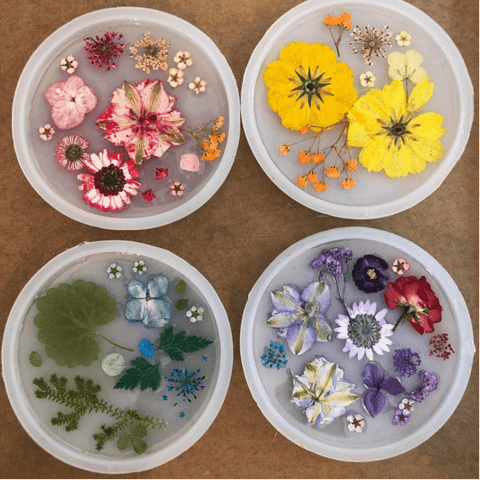
Project - Rainbow Coaster Set with Dried Flowers

Supplies You Need
- 2-Part epoxy resin
- Silicone coaster mold set
- Dried flowers and leaves
- Mixing cups
- Wooden stirrers
- Toothpicks
- 1 sheet of blank paper
- Kitchen scale or measuring cup
- Kitchen torch or lighter (optional)
- Tweezer (optional)
- Parchment Paper (can substitute wax paper)
- Nitrile gloves
- Flat surface
- Something to protect surface
- Lots of ventilation

How to Preserve Flowers in Resin
1. Prep
Before you pour any resin, take one coaster and trace around it onto a piece of paper 4 times to make a template with 4 coaster-sized circles. Set this aside until you get to the flowers.
Next, since this project will result in clear coasters with embedded flowers, we want to make sure the coaster molds are as clean as possible. Remove any bits of resin from previous projects and then wipe with alcohol to get rid of any old dyes or debris.
2. Begin Casting
To begin, you’ll need enough mixed resin to cover the bottom of each coaster mold, plus more for the coaster holder. An ounce of mixed resin per mold should be enough, but you can use the epoxy resin calculator to be more accurate.
Using a measuring cup or scale, mix up a batch of 2-part clear epoxy with equal parts of resin and hardener. Mix well according to package instructions. Let the mixed resin sit for a few minutes so some of the bubbles can come to the top and pop.
Next, pour equal amounts of mixed resin into each coaster mold. The resin needs to cover the entire bottom surface and be about 2-4 millimeters thick. This will end up being the clear TOP of your coaster. Let the resin sit a few minutes, and then briskly run your torch or lighter over the resin to pop the bubbles that rise up. Wait 10-15 minutes and repeat popping bubbles. If you don’t have a torch, pop bubbles with a pin or toothpick.
Let the first layer of resin thicken to a “cold honey” consistency. Basically, you want the flowers to sit on top of the resin and stick to it. How long this takes depends on your room temperature and humidity.
Note: I’m going to give you the instructions for the coaster holder at the end of this tutorial, but you should make the holder while making the coasters because you’ll use all the same materials. Just remember to mix enough resin to include the coaster holder.
3. Arrange the Flowers
Here’s the part where you get to be really creative. While the first layer of resin is setting, take out your dried flowers and paper coaster template and plan your coaster designs. You will need to work on a flat surface, in a place with no wind or drafts so the flowers don’t blow around.
Someplace that’s also near the coasters would be ideal.

Now start forming the rainbow. Each coaster will have 1-2 colors blending into one another in the following order: red, orange, yellow, green, blue, purple (ROYGBIV).
4. Add Flowers to the Molds
When the first layer of resin has started to set it’s time to place your flowers.
You will gently pick up the flowers from your template and lay them UPSIDE DOWN in the thickened resin one at a time. The dried flowers will float on top of the resin and stick in place. You can use tweezers or your fingers to place the flowers where you want and recreate your template design. If needed, carefully pat down the back of each placed flower so all of it touches the sticky resin. If the resin hasn’t set fully yet, you can adjust the position of the flowers by gently pushing them around with a toothpick.


When all of your flowers are moved from the template to the molds, leave the molds undisturbed to cure until the resin is firm. Cover your coasters with a box if they’re outside. Curing time will vary with environmental conditions. The resin doesn’t need to be fully cured before the next step, but it can be. You can even come back a day or two later if you want.

5. Back to Casting - 2nd Resin Layer
Using a toothpick, gently poke the resin to make sure it’s firm. It can still be sticky, but not liquid. Then mix a new batch of resin following the instructions in the first step. You will need more resin this time since you will be filling the coasters the rest of the way.
Slowly pour the mixed resin over the cured layer. If your flowers are exposed and fragile, pour off to the side and let the resin flow over them. This will keep the flowers from getting damaged and allow trapped air to escape. It’s best to pour some resin into each mold and let the resin spread over the flowers first. When everything is covered, go back and add more resin to each mold until all the molds are filled. Then briskly run your torch or lighter over the resin to pop the bubbles that rise up. Wait 10-15 minutes and repeat.
Leave the molds undisturbed to harden until the resin is fully cured. Overnight is recommended. Cover your coasters with a box if they’re outside to keep out dust and debris. Remember,curing time will vary with environmental conditions.

Now comes the exciting part. First, make sure your coasters are fully cured. They shouldn’t be at all sticky or bendable. Next, gently pull a mold away from its coaster and then pop the rest out. Turn it over and see your dried flower creation! Now repeat with the rest of your coasters and you have a gorgeous set of rainbow flower coasters.

Project Coaster Holder - Different Instructions
As you work on your coaster molds, you can also create the coaster holder. Here are the parts of the instructions that are different for the coaster holder:
- When you pour the first layer of clear resin into the coaster molds, also pour some of the mixed resin into the holder mold. Pour the resin down the sides about ⅓ of the way up. Let this resin thicken just like the coaster molds.
- Plan a rainbow of flower colors to circle the holder while you wait.
- When you top off the coaster molds with the second layer of mixed resin, fill the holder mold up the rest of the way with resin as well.
- Now add your rainbow flowers to the holder. Gently pick up one flower and slide it into the wet resin down the side of the holder. Make sure the FRONT of your flower is facing the OUTSIDE. The flowers will be stopped by the hardened resin, so they won’t go all the way down. You will end up with a band of flowers around the base of the holder.
- If the flowers float up too far, poke them down with a toothpick.
- Wait overnight and remove the holder from the mold.
Frequently Asked Questions
Can I preserve fresh flowers in resin?
No. You can preserve natural flowers in resin, but they have to be 100% dry first. Any moisture will get locked in the resin and cause the flower to rot over time. If you use fresh flowers they may look surprisingly lovely at first, but over time will turn brown and ugly.
Do I have to seal dried flowers before adding them to resin?
Most dried natural flowers can be set into resin without sealing them first. One exception is if the flower is too delicate to work with otherwise. Another exception is if the dried flowers are dyed to enhance the color. Then you may need to test one and see if the dye bleeds and should be sealed. (I didn’t seal any flowers for the tutorial above.)
Will flowers turn brown in resin?
No. Properly dried flowers that contain no moisture will be preserved exactly the same as when you first add them to the resin. If anything, resin will give the dried flowers more vibrancy.
How can I use dried flowers in resin projects?
You can use dried flowers exactly the way you use any other inclusions. Add them to resin to make jewelry, keepsakes, and more. Use them the same way you use charms, glitter, and photos!
What should I do if my flowers float in the resin?
Dried flowers are light and delicate and may sometimes float when you pour resin over them. Fortunately, there are some easy fixes, especially if you plan ahead.
- If you add flowers on top of a thin layer of resin as described in the tutorial above, exactly where you want them, they will be stuck to the top of this layer as it cures. Then simply add your next layer of resin over the cured resin and flowers.
- If your resin is thin and flowers aren't stuck down first, they may keep popping to the surface. Use a toothpick to poke them down until the resin thickens. (You don’t have to hold them down the whole time - just poke them under when the resin is thick.)
Will flowers last forever in resin?
Yes! This is one of the exciting things about preserving dried flowers in resin.
Have Fun!
So as you can see, whatever your reason for preserving flowers in resin, the combination of resin and dried flowers yields beautiful results. And once you know the basics of crafting resin pieces with embedded flowers as described above, you can make any number of stunning objects. As you gain comfort with the techniques described in this article you can also start to expand your palette by experimenting with additives such as colorants and glitter. The sky’s the limit!
4 comments
@JUDI VINCENT Judi, thank you for your lovely comment! It’s wonderful to hear that you’ve been exploring different ways to use your flowers, from making wreaths to pressing them. I’m delighted that the post gave you ideas for using your new resin kit with your pressed flowers. Resin is a fantastic way to preserve and showcase the beauty of your garden. If you need any tips or guidance as you embark on this new crafting adventure, please don’t hesitate to ask. Also, I’d be thrilled to see your resin creations with your pressed flowers – if you’re comfortable sharing, please do! Best of luck with your resin projects, and I hope they add an extra sparkle to your holiday season. :)
Thankyou so much for your detailed instructions. I grow and dry flowers to make wreaths usually but last year I decided to trying pressing some of my flowers too . For Christmas I was given a resin kit and I have been looking for ideas of how to use my flowers. Now I know, thankyou.